Gluing on Patches: Your Ultimate Guide to Perfect Application

Applying patches with fabric glue offers a versatile and accessible alternative to sewing or ironing, particularly useful for delicate fabrics or when heat application isn’t ideal. This comprehensive guide provides detailed, step-by-step instructions, material recommendations and essential troubleshooting advice. Gain the confidence to personalize your clothing and accessories with ease, achieving professional-looking results every time. Let’s see!
1. Choosing the Right Materials for Patch Gluing
1.1 Patch Types and Their Best Uses
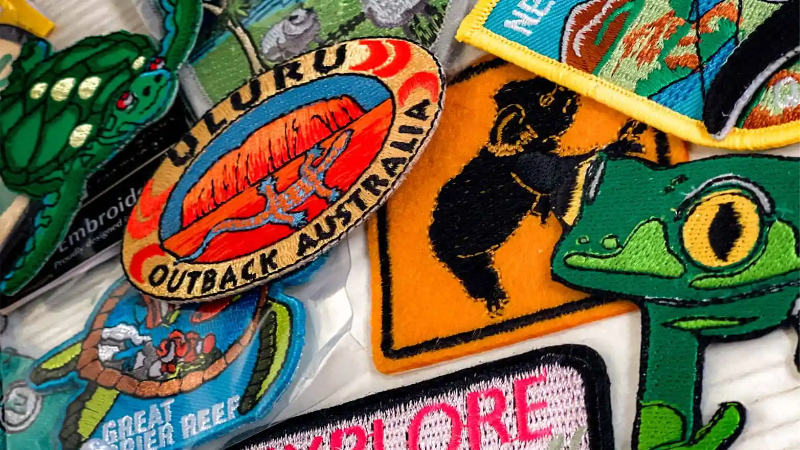
Choosing the right patch type is key to successful gluing and achieving the desired look for your garments. Each type offers distinct qualities suited to different applications.
- Embroidered patches are known for their classic, detailed thread designs. They are versatile and work well on jeans, jackets, and bags, adding a traditional, robust feel. Choose them for designs needing a timeless and textured impact.
- Chenille patches provide a soft, plush texture, ideal for adding a luxurious touch. Best used on jackets, especially varsity styles, and bags, they offer a cozy and eye-catching element. Consider chenille for designs that benefit from a tactile and inviting feel.
- Leather patches offer a rugged, high-end aesthetic with their natural grain and durability. Perfect for jackets and bags, they enhance perceived value and longevity. Use leather patches to add a sophisticated and durable detail.
- Printed patches excel in vibrant colors and detailed graphics. Their versatility suits a wide range of applications, from logos to decorative accents. Opt for printed patches when your design requires intricate images or a broad color spectrum.
- Woven patches are valued for their durability and refined, flatter finish. Excellent for clothing and accessories needing to withstand wear, like uniforms and workwear. Woven patches provide a professional, long-lasting branding solution.
1.2 Fabric Compatibility with Glues
Fabric glue selection is crucial for a secure and lasting patch application. Porous fabrics like cotton, denim and flannel absorb glue readily, requiring a strong, quick-drying adhesive. Non-porous materials such as nylon, PVC and leather necessitate a glue with excellent adhesion to slick surfaces. Glue for patches should be compatible with both the patch material and the garment fabric. Using the incorrect adhesive can result in a loose patch or damage to the garment. Matching glue to fabric is key to a successful project.
2. Step-by-Step Guide to Gluing on Patches
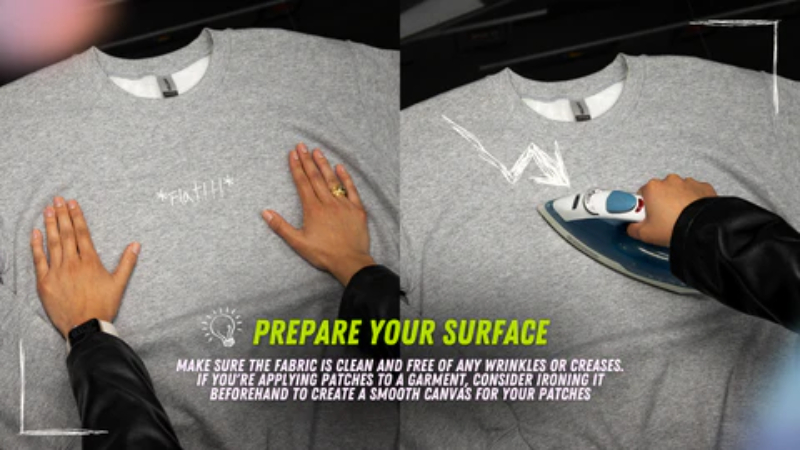
2.1 Preparing the Surface for Gluing
Before you even think about applying glue to a patch, the groundwork lies in properly preparing the fabric surface. This step is absolutely non-negotiable if you want your patches to adhere securely and look professional in the long run. Think of it like prepping a wall before painting – the smoother and cleaner the base, the better the final result.
The first order of business is a thorough cleaning of the area where the patch will be placed. Fabric can accumulate a surprising amount of dust, dirt, and natural oils, even if it looks clean to the naked eye. These invisible culprits can significantly hinder the glue’s ability to bond effectively with the fabric. Start by using a lint roller to meticulously remove any loose fibers, threads, or debris from the surface. This simple tool is surprisingly effective at picking up particles you might otherwise miss.
Next, address any potential oils or residues on the fabric. Depending on the type of fabric and its history, there might be manufacturing residues, fingerprints, or even traces of lotions or body oils. For most fabrics, a slightly damp cloth can be used to gently wipe down the area. If you suspect more stubborn residues, a mild, diluted fabric cleaner can be applied sparingly, followed by wiping with a clean, damp cloth to remove any cleaner residue. Always ensure you test any cleaner on an inconspicuous area of the fabric first to confirm it doesn’t cause discoloration or damage.
Finally, and this is a critical point often overlooked, ensure the area is completely dry before proceeding with glue application. Moisture is the enemy of most adhesives. Even if the fabric feels dry to the touch, there might be residual dampness deep within the fibers, especially after cleaning. Allow the fabric to air dry thoroughly after cleaning and ironing. In humid environments, or if you’re working with thicker fabrics, you might even consider using a hairdryer on a cool setting for a short time to ensure complete dryness.
2.2 Selecting and Applying the Right Glue
The adhesive you choose is just as critical as the patch itself. Think of glue as the silent partner in patch application; it’s unseen but absolutely essential for the final outcome. Selecting the right glue isn’t just about sticking things together; it’s about ensuring a bond that’s durable, flexible, and compatible with your fabric, ultimately reflecting the quality of your clothing brand.
For fabric patches, you absolutely need to use glues specifically formulated for fabrics. These aren’t your everyday craft glues; they are engineered to create a strong yet flexible bond that can withstand movement, washing, and regular wear – all crucial factors for garments. Several reputable brands consistently deliver excellent results in the garment industry. Consider options, known for its strong, permanent bond and washability.
And for projects requiring exceptional strength and a bit more industrial-grade adhesion. These fabric-specific glues are designed to maintain flexibility, preventing the fabric from becoming stiff and uncomfortable around the patch area, a common issue with inappropriate adhesives.
Conversely, steer clear of glues that are not designed for fabrics. Super glue (cyanoacrylate), for instance, is tempting for its rapid bonding, but it’s a disastrous choice for fabrics. Super glue creates a very rigid, brittle bond that can crack and fail with fabric movement.
It can also bleed through fabric, causing unsightly stains and stiffness. Similarly, hot glue, while useful for many crafts, is generally not suitable for garment patches. Hot glue bonds tend to be thick and raised, creating an unnatural look and feel on clothing.
Furthermore, hot glue can be sensitive to heat and washing, potentially weakening or even melting over time. And in some cases, both super glue and hot glue can cause discoloration or damage to certain fabric types.
When it comes to applying fabric glue, less is often more. The key is even distribution, not excessive quantity. Over-applying glue can lead to seepage around the patch edges, creating a messy appearance and potentially stiffening the fabric unnecessarily.
For precise and controlled application, consider using tools like toothpicks, small brushes (like fine art brushes), or cotton swabs. These tools allow you to apply a thin, even layer of glue to the back of the patch, focusing on the edges and ensuring consistent coverage without globs or pooling. Think of it as creating a uniform contact layer rather than drowning the patch in adhesive.
Finally, always factor in the drying time of the adhesive you choose. Drying times can vary significantly between different fabric glues, ranging from a few minutes to several hours for a full cure. Consider the drying time in relation to your production workflow.
If you’re working on a larger scale, faster-drying glues might be preferable to expedite the process. However, always allow the glue to fully cure according to the manufacturer’s instructions before handling or packaging the garments to prevent shifting or weakening of the bond.
2.3 Ensuring Proper Adhesion and Drying
Once you’ve meticulously applied the glue and positioned your patch, the next crucial step is to ensure proper adhesion and allow for thorough drying. This is where patience and technique come into play, transforming a potentially good application into a truly exceptional and long-lasting one.
Think of it as encouraging the glue to fully “wet out” and penetrate the fabric fibers, creating a robust mechanical bond in addition to the adhesive bond. Without adequate pressure, you risk gaps and weak points in the adhesion, leading to premature peeling or lifting, especially at the edges of the patch.
You have several effective methods for applying this necessary pressure. For smaller patches or quick applications, firm finger pressure applied evenly across the entire patch surface for several minutes can be sufficient.
However, for larger patches or when aiming for maximum consistency, tools can be incredibly helpful. A fabric roller (like those used in quilting or wallpapering) is excellent for distributing pressure uniformly across the patch. Roll firmly back and forth over the patch, ensuring you cover every area, especially the edges.
Alternatively, placing a heavy, flat object on top of the patch can provide consistent pressure over a larger area. Good options include books, weights, or even a flat piece of wood. If using a heavy object, ensure you place a clean piece of fabric or paper between the object and the patch to prevent any potential transfer of color or texture, and to protect the patch surface itself.
Regardless of the method, aim to maintain consistent pressure for at least a few minutes, and ideally for the duration recommended in the glue manufacturer’s instructions.
While natural air drying is generally recommended for most fabric glues to achieve the strongest bond, you can carefully expedite the drying process if needed, especially in time-sensitive production environments. A hairdryer on a low heat and low airflow setting can be used cautiously to gently warm the patch area.
The key here is low heat and low airflow. Excessive heat can actually weaken some adhesives or even damage certain patch materials or fabrics. Keep the hairdryer moving and at a distance from the patch, focusing on gentle warmth rather than direct heat.
Think of it as a gentle nudge to speed up evaporation, not a blast furnace. Always test the heat sensitivity of your patch and fabric combination in an inconspicuous area first before applying any heat to the main application.
An often-overlooked detail during the drying process is removing air bubbles. Air trapped between the patch and fabric can create weak spots and prevent full adhesion in those areas, ultimately leading to peeling. As the glue dries, gently smooth outwards from the center of the patch towards the edges.
This action helps to push out any trapped air and ensures a flat, smooth finish. You can use your fingers or a smooth, rounded tool for this, like the back of a spoon or a burnishing tool. Repeat this smoothing action periodically during the initial drying phase, especially in the first 15-20 minutes after application.
Finally, and perhaps most importantly, allow sufficient drying time. Even if the surface of the glue appears dry to the touch, the adhesive might still be curing and strengthening its bond beneath the surface. Resist the urge to handle or manipulate the garment excessively during the initial drying period.
Refer to the glue manufacturer’s instructions for recommended drying times and curing times. Full cure times can sometimes be longer than surface drying times, and achieving full cure is essential for maximum bond strength and longevity, especially for garments that will undergo washing and regular wear.
2.4 Sealing the Patch (Optional)
While achieving a strong bond with the right glue and proper application techniques is crucial, taking the extra step of sealing your patch edges can significantly elevate the durability and lifespan of your patch application. Consider patch sealing as an optional insurance policy against wear and tear, especially for garments that are intended for frequent use or exposure to challenging conditions.
Sealing becomes particularly beneficial for items that will be washed regularly. Each wash cycle, while cleaning the garment, also introduces stress to the edges of the patch. Water, detergents, and the mechanical action of washing machines can gradually weaken the adhesive bond at the edges over time, potentially leading to fraying or peeling. Sealing these vulnerable edges creates a protective barrier, minimizing water penetration and preventing the adhesive from being directly exposed to the rigors of washing.
Similarly, patches placed in high-stress areas of a garment – think elbows, knees, cuffs, or areas that experience friction or bending – are prime candidates for sealing. These areas are naturally subjected to more movement and abrasion, which can put extra strain on the patch edges. Sealing in these locations provides added reinforcement, helping the patch withstand the daily wear and tear and maintain its integrity for longer.
So, what exactly do you use for sealing? Fabric sealants and seam sealers are specifically designed for this purpose. Fabric sealants are generally formulated to create a flexible, protective layer over fabric edges, preventing fraying and reinforcing seams.
Seam sealers, often used in outdoor gear and waterproof clothing, are designed to create a water-resistant or waterproof barrier along seams and edges. Both types can be effective for sealing patch edges, depending on the level of protection you require.
For enhanced protection, especially if your garments are intended for outdoor use or exposure to wet conditions, consider using a waterproof sealant. These sealants provide an extra layer of defense against moisture, further minimizing the risk of water damage to the adhesive and patch edges. A waterproof sealant can be particularly valuable for patches on jackets, bags, or outerwear.
The benefits of sealing are clear: it significantly extends the patch’s life and proactively prevents fraying or peeling. This translates to garments that maintain their embellished look for longer, enhancing customer satisfaction and reflecting a commitment to quality. It’s a small investment in time and materials that yields substantial returns in terms of product longevity and perceived value.
However, it’s crucial to choose a sealant that is compatible with both the patch material and the garment fabric. Just as with glues, not all sealants are created equal, and some may react negatively with certain materials. Always check the sealant manufacturer’s recommendations for compatibility.
Ideally, test the sealant on a scrap piece of the patch material and garment fabric in an inconspicuous area first to ensure there are no adverse effects like discoloration, stiffness, or damage to the materials. Look for sealants that are specifically labeled as fabric-safe and flexible.

3. Troubleshooting Common Patch Gluing Problems
3.1 Glue Not Drying/Slow Drying
Experiencing slow-drying glue can be undeniably frustrating, especially when you’re working on a production schedule. It can halt your workflow and potentially compromise the quality of your finished garments if not addressed properly. However, in most cases, slow drying is not a glue defect but rather a result of environmental factors or application techniques that can be easily rectified.
Think of it like trying to dry laundry in a stuffy room versus a breezy outdoor space. The solution is simple: increase ventilation in your work area. Open windows, turn on exhaust fans, or use a portable fan to circulate air around the glued patches. Improved airflow will significantly promote faster evaporation and accelerate the glue curing process.
Another effective, yet often overlooked, technique to gently speed up drying is using low heat. A hairdryer set on a low heat and, importantly, a low airflow setting can be used to cautiously encourage faster drying. The gentle warmth can help to accelerate evaporation without damaging the glue or fabric. However, caution is paramount here. High heat can be detrimental to some adhesives, potentially weakening the bond or even causing bubbling or distortion.
Always use the lowest heat setting and keep the hairdryer moving, holding it at a reasonable distance from the patch – think of it as a gentle warm breeze, not a blast of hot air. And, as a golden rule, always test the hairdryer method on a hidden area of your garment first to ensure there are no adverse effects on the fabric or patch material. This precautionary step can save you from potential damage to your finished product.
Furthermore, consider your glue application technique. Applying thick coats of glue is a common mistake that significantly slows down drying time. Thicker layers of glue naturally take longer to dry because the solvents have a longer distance to travel to evaporate from the inner layers. Instead of applying a thick glob, aim for thinner, more even coats of glue.
As discussed earlier, even distribution is more important than quantity. A thin, uniform layer provides sufficient bonding surface while allowing for faster and more consistent drying. Using application tools like toothpicks, fine brushes, or cotton swabs can help you achieve this thin and even application.
In essence, troubleshooting slow glue drying often boils down to examining your application techniques and environmental conditions. By ensuring good ventilation, cautiously using low heat when appropriate, and applying thinner, more even coats of glue, you can effectively address most slow-drying issues and maintain an efficient workflow. Remember, patience is key, but understanding these troubleshooting steps can help you optimize the drying process without compromising the quality of your patch applications.
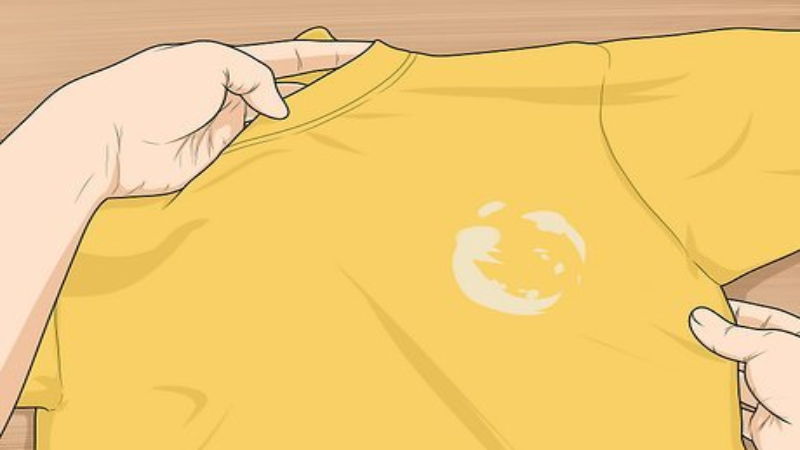
3.2 Glue Marks and Residue
Nobody wants unsightly glue marks detracting from the look of their carefully applied patches. Preventing and dealing with glue marks and residue is a key aspect of achieving a polished, professional finish. The best approach here is a combination of preventative measures and knowing how to handle mishaps when they occur.
The most effective way to avoid glue marks is prevention, and prevention starts with testing your chosen glue. Before applying glue to your final garment, always test it in an inconspicuous area or on a scrap piece of the same fabric.
This simple step allows you to observe how the glue behaves with the fabric – does it bleed through? Does it leave a visible sheen or discoloration upon drying? This test run can save you from potential disasters on your finished products.
Despite your best efforts, sometimes excess glue can squeeze out from under the patch edges during application. If this happens, the key is to act immediately. While the glue is still wet, gently remove the excess using a clean, damp cloth or a cotton swab.
Work quickly and lightly, dabbing rather than rubbing, to avoid spreading the glue or pushing it further into the fabric. The goal is to lift the excess glue before it has a chance to dry and become more difficult to remove. Using a slightly damp cloth is usually sufficient for most fabric glues when addressed promptly.
However, if you discover stubborn glue residue after the glue has dried, or if water alone isn’t effective, there are specific glue removers available on the market. These removers are formulated to break down adhesive bonds without damaging fabrics.
However, caution is essential when using any type of solvent or chemical remover. Always check the compatibility of the glue remover with your specific fabric before applying it to the garment. Test the remover on a hidden area first to ensure it doesn’t cause discoloration, damage the fabric fibers, or alter the fabric’s texture.
When applying any type of remover, start with the mildest option first. Harsh chemicals can be aggressive and potentially damage delicate fabrics. Begin with a fabric-safe glue remover specifically designed for adhesives.
Apply a small amount to a clean cloth or cotton swab and gently dab at the residue, working from the outside edges of the stain inwards to prevent spreading. Avoid rubbing vigorously, as this can damage the fabric surface.
Repeat the process as needed, using fresh, clean cloths or swabs each time to avoid re-depositing removed glue back onto the fabric. After using any remover, it’s generally a good idea to gently clean the area with a slightly damp cloth to remove any remaining remover residue and allow the fabric to air dry completely.
Dealing with glue marks and residue requires a delicate and patient approach. Prevention through testing and careful application is always the best strategy. But when mishaps occur, prompt action and gentle, fabric-compatible removal techniques can help you salvage your work and maintain the quality of your finished garments.
3.3 Weak Adhesion and Peeling
A patch that starts peeling off is not only frustrating but also reflects poorly on the quality of your garment. Weak adhesion can stem from various factors, and understanding these causes is crucial for preventing peeling and ensuring a secure, long-lasting bond.
The solution here is straightforward: use stronger adhesives specifically designed for fabric, such as the fabric glues we discussed earlier like Aleene’s Fabric Fusion, Beacon Fabri-Tac, or E6000. These glues are formulated to create robust bonds that can withstand the stresses of garment wear.
3.4 Fabric Stiffness and Discoloration
Imagine a beautifully designed patch applied to a garment, only to find that the area around the patch becomes stiff and uncomfortable, or worse, discolored. Fabric stiffness and discoloration are unwelcome outcomes that can detract significantly from the overall quality and wearability of your patched items. Fortunately, both of these issues are largely preventable with careful material selection and application techniques.
Fabric stiffness in the patch area is almost always a direct result of using inappropriate glues. Many general-purpose adhesives, when dried on fabric, create a rigid, inflexible bond. This stiffness can make the garment uncomfortable to wear, especially in areas that require flexibility and movement.
The key preventative measure is to choose flexible fabric glues specifically formulated to remain pliable even after drying. These specialized fabric glues are designed to move with the fabric, maintaining the garment’s natural drape and comfort. Always prioritize glues that are explicitly labeled as “flexible” or “fabric-friendly” for garment applications.
Beyond glue choice, glue compatibility with the fabric itself is also crucial. Some glues, even fabric glues, might react poorly with certain fabric types, leading to stiffness or undesirable changes in fabric texture. Again, testing your chosen glue on a scrap of the garment fabric before full application is a vital step to identify any potential compatibility issues and avoid stiffness problems on your finished products.
Excessive heat during the drying process can also contribute to fabric stiffness. While we discussed using low heat to speed up drying cautiously, high heat is definitely detrimental. Using a hairdryer on a high heat setting, or applying an iron directly to the patched area, can cause the glue to become brittle and stiffen the fabric.
Therefore, if you choose to use heat to accelerate drying, always stick to low heat settings and maintain a distance. Ideally, air drying is the gentlest and safest method to prevent fabric stiffness.
Discoloration is another potential issue that can arise from glue application. This can manifest as visible glue marks, yellowing, or changes in the fabric’s original color around the patch. Checking the glue label for any warnings about potential discoloration is a good first step. Reputable fabric glue manufacturers often provide information about colorfastness and potential discoloration risks.
Similar to stiffness, glue incompatibility can also be a cause of discoloration. Certain glues might contain solvents or chemicals that react with dyes in the fabric, leading to color changes or staining. And, as always, testing the glue on a fabric scrap is the best way to preemptively identify any potential discoloration issues before applying glue to your final garments.
To minimize the risk of both fabric stiffness and discoloration, the core principles are: choose flexible, fabric-specific glues, always test glue compatibility on scrap fabric, avoid excessive heat during drying, and apply glue in thin, even layers to prevent saturation and potential bleed-through.
By adhering to these best practices, you can largely eliminate these undesirable outcomes and ensure your patched garments remain comfortable and visually appealing.
3.5 Air Bubbles and Uneven Surfaces
Air bubbles trapped beneath a patch can create uneven surfaces and, more importantly, weaken adhesion in those areas. These bubbles not only detract from the smooth, professional look of your patch application but also create potential points of vulnerability where the patch might start to lift or peel over time. Preventing and removing air bubbles is therefore a crucial step in achieving a flawless and durable patch application.
The key to preventing air bubbles is to work carefully and methodically during patch placement and adhesion. As you position the patch onto the glued fabric, gently press downwards from the center outwards. This technique helps to expel air outwards towards the edges as you lay the patch down, minimizing the chance of trapping air underneath.
If you notice air bubbles forming as you apply the patch, take immediate action to smooth them out before the glue dries. You can use various tools for this purpose. Your fingers can be effective for smaller patches and easily accessible areas.
For larger patches or to achieve more even pressure, a fabric roller or even a smooth, firm object like a credit card can be very helpful. Using your chosen tool, gently but firmly press and smooth outwards from the center of the patch towards the edges, working to push the trapped air out from under the patch.
Work quickly during this smoothing process, as fabric glues can start to set relatively quickly, and once the glue begins to dry, it becomes much more difficult to remove trapped air.
If, despite your best efforts, some stubborn air bubbles remain trapped even after smoothing, there’s a simple trick you can use. Carefully take a fine pin or needle and pierce the air bubble at its highest point. This creates a tiny escape route for the trapped air.
Immediately after piercing the bubble, smooth the area again with your finger or chosen tool to release the air and flatten the patch. The pinhole is usually so small that it becomes virtually invisible once the glue dries and the fabric fibers settle back into place. However, exercise caution when using a pin to avoid damaging the patch material or fabric fibers excessively.
Working quickly is indeed key to preventing air bubbles from becoming permanently trapped. Fabric glues often have a relatively short open time, meaning the window of time you have to manipulate and adjust the patch before the glue starts to set is limited.
Having your patch positioned correctly and being ready to smooth out any bubbles immediately after placement will significantly improve your chances of achieving a bubble-free, even surface.
By paying attention to your application technique, using smoothing tools effectively, and working promptly, you can minimize air bubbles and ensure your patched garments have a smooth, professional, and securely adhered finish.
4. FAQs about Gluing on Patches
4.1 Can I wash clothes with glued-on patches?
Washing clothes with glued-on patches requires careful attention to protect the patch’s adhesion. Always turn the garment inside out before washing to protect the patch from abrasion. Use a gentle wash cycle and avoid harsh detergents or bleach, which can weaken the glue.
4.2 What types of fabrics are unsuitable for gluing patches?
Certain delicate fabrics are unsuitable for glue-based patch application. Silk, velvet and very stretchy materials may be damaged by the glue or may not hold the patch securely. The glue’s solvents could affect the fabric’s color or texture. For these materials, sewing the patch is a far more reliable and safer method to ensure a lasting bond and avoid damaging the garment.
4.3 Can I remove a glued-on patch?
Removing a glued-on patch can be tricky and may result in fabric damage. Apply gentle heat to soften the glue, then carefully try peeling the patch from an edge. Test a solvent on an inconspicuous area first as it may damage or discolor the fabric. Aggressive peeling may damage the garment.
4.4 Is gluing or sewing patches better?
Gluing and sewing are both viable methods for attaching patches, each with its own advantages and disadvantages. Gluing offers a faster, easier method, ideal for smaller patches and less-stressed areas. However, glued patches may not be as durable as sewn patches and are more prone to peeling or detachment, particularly in areas subject to frequent wear.
Sewing, while more time-consuming, provides a significantly stronger, more long-lasting bond, making it the preferred method for high-stress areas or larger patches. The best method depends on the patch, fabric and intended use.
4.5 Where can I find high-quality patches for my projects?
High-quality patches are available from various sources. Online marketplaces offer a wide selection from numerous vendors. Specialty patch stores often carry unique designs and higher-quality materials. Local craft stores may also offer patch options. For truly unique and personalized patches perfectly tailored to your vision, Packlove offers custom patch services ensuring the highest quality and design flexibility to meet your specific project needs.
5. Packlove – Providing services for Custom Patches and Packaging
Packlove offers comprehensive custom patch and packaging solutions, combining design expertise with high-quality printing. We specialize in creating personalized patches tailored to individual and business needs, offering a wide array of materials, sizes, shapes and printing options to ensure your vision is realized. Our experienced team provides support throughout the process, from initial design consultation to final product delivery. We pride ourselves on providing exceptional customer service and crafting superior, long-lasting products.
To explore our product options or request a quote for your custom patch or packaging needs, please visit our website at https://Packlove.com/, email us at infopacklove@gmail.com, or call us at +84 363615867. We also offer design services to help bring your ideas to life. Contact us today to begin your project!
Read more:
- Iron on Patches to Polyester: A Safe & Easy Guide – Packlove
- How to Make Patches: DIY Embroidered & Iron-On Patch Guide
- How to Put Patches on a Letterman Jacket: A Complete Guide
This guide has covered essential aspects of successfully gluing patches onto various fabrics. From selecting appropriate adhesives and preparing surfaces to mastering application techniques and troubleshooting common problems, we’ve explored the key steps to achieving a professional and durable result. To elevate your patch projects to the next level, explore the vast selection of high-quality patches and packaging solutions available at Packlove. Let Packlove help you create something extraordinary!


